Protect Endpoints
The Protect Endpoints feature lets you require a valid JWT for any WordPress REST API route. Use it to lock down sensitive data - such as user profiles, private posts, or custom post types - so they can only be accessed by authenticated callers.
When a protected endpoint is called without a valid JWT, the plugin returns a 403 error immediately, before WordPress processes the request.
The following error will be displayed, when an endpoint is protected and no JWT is provided:
{
"success": false,
  "data": {
    "message": "You are not authorized to access this endpoint.",
    "errorCode": 403,
    "type": "simple-jwt-login-route-protect"
  }
}
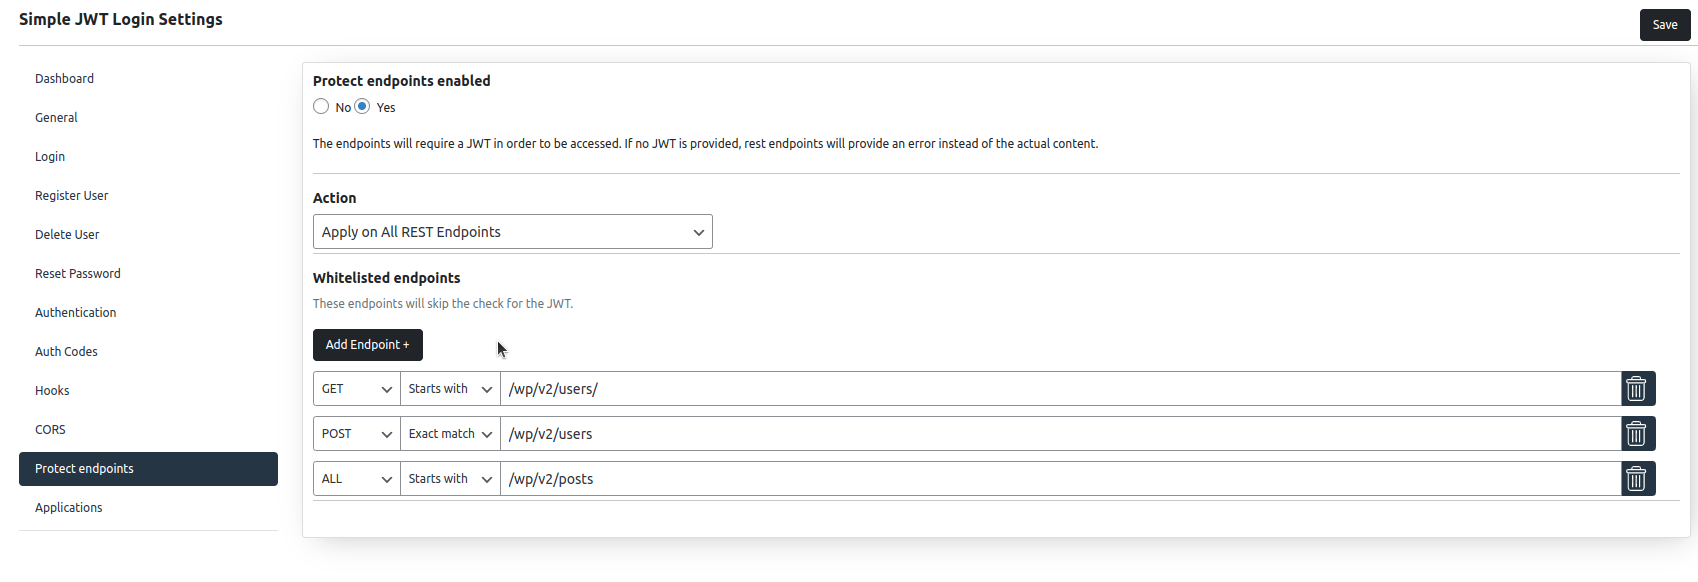
Screenshot
Protection Modes
You can choose between two protection modes:
- Protect all endpoints
- Protect only specific endpoints
1. Protect All Endpoints
When enabled, this option secures all endpoints except those explicitly listed in the "Whitelist." To exclude an endpoint from protection, add it to the whitelist using the "Add Endpoints +" button.
2. Protect Only Specific Endpoints
This option protects only the endpoints listed in the "Protect Endpoints" section. To secure an endpoint, add it using the "Add Endpoint" button.
Configuration Options
Request Methods
For each endpoint, you can define which HTTP request methods (GET, POST, PUT, DELETE, etc.) require authentication. Alternatively, selecting ALL will enforce the rule for every request method.
Route Matching
There are two ways to define how an endpoint is matched:
- Starts with: The rule applies to any endpoint that begins with the specified path.
- Exact match: The rule applies only if the accessed endpoint exactly matches the specified path.
Example Configurations
Example 1
Assume you specify /wp/v2/users with ALL and Exact Match in either the Protect or Whitelist settings.
The rule applies to these URLs:
http://yoursite.com/?rest_route=/wp/v2/usershttp://yoursite.com/wp-json/wp/v2/users
Example 2
Assume you specify /wp/v2/users with GET and Starts With in either the Protect or Whitelist settings.
The rule applies to these URLs when called with GET only:
http://yoursite.com/?rest_route=/wp/v2/usershttp://yoursite.com/?rest_route=/wp/v2/users/1http://yoursite.com/wp-json/wp/v2/usershttp://yoursite.com/wp-json/wp/v2/users/1http://yoursite.com/wp-json/wp/v2/users/{any_other_path}
Example 3
Assume you specify /wp/v2 with ALL and Starts With in either the Apply only on Specific Endpoints.
This way, you are making all the endpoints under /wp/v2* protected and they will be accessible only with a JWT.
For example, all these endpoints will be protected:
/wp/v2/users/wp/v2/posts/wp/v2/comments
How to Pass the JWT
The JWT token can be provided in multiple ways, depending on the options set in the plugin’s General settings:
- Header
- Request URI
- Request Body
- Session
- Cookie
Examples
Sending JWT in header:
curl -X POST "http://localhost/wp/v2/users" -H "Authorization: YOUR_JWT"
Sending JWT as query parameters:
curl -X POST "http://localhost/wp/v2/users?jwt=YOUR_JWT"
or
curl -X POST "http://localhost?rest_route=/wp/v2/users&jwt=YOUR_JWT"
Sending JWT as request body:
curl -X POST "http://localhost/wp/v2/users" -H "Content-type: application/json" -d '{"JWT":"JYOUR JWT"}'
By following these instructions, you can efficiently protect and manage API access using Simple JWT Login.