Configuration
The General settings page is the foundation of Simple JWT Login. It controls the API route prefix, how JWTs are signed and verified, where the plugin looks for tokens in incoming requests, and global security options.
Go to Settings → Simple JWT Login → General to configure these options.
Server
The Simple-JWT-Login REST API is accessible via two URL formats. Both are equivalent - choose the one that fits your WordPress permalink configuration:
- Pretty permalinks (recommended):
https://{domain}/wp-json/simple-jwt-login/v1/{endpoint} - Query-string format (works even without pretty permalinks):
https://{domain}/?rest_route=/simple-jwt-login/v1/{endpoint}
Request Parameters
Parameters can be sent in any of the following ways:
- JSON request body (recommended for POST/PUT/DELETE requests)
- Query string (convenient for GET requests and quick testing)
- Form data (
application/x-www-form-urlencoded)
The JWT parameter name is case-insensitive - jwt, JWT, and Jwt are all accepted.
Initial Configuration
- Go to Settings → Simple JWT Login → General.
- Set a JWT secret key and choose a signing algorithm in the JWT Verification Rules ELSE row (the required default rule). See JWT Verification Rules below.
- Click Save Changes.
Use a long, random string for the JWT secret key. This key is equivalent to a master password - anyone who knows it can forge valid tokens.
Route Namespace

The Route Namespace is the URL prefix for all Simple JWT Login REST endpoints. The default is simple-jwt-login/v1/.
Change this only if you need to avoid a conflict with another plugin. The value is trimmed of leading and trailing slashes automatically.
https://example.com/wp-json/simple-jwt-login/v1/auth
                             ^^^^^^^^^^^^^^^^^^^
                             route namespace
If you change the route namespace after you have already issued JWTs, any existing links that embed the old endpoint URL (e.g. autologin links in emails) will stop working.
JWT Verification Rules
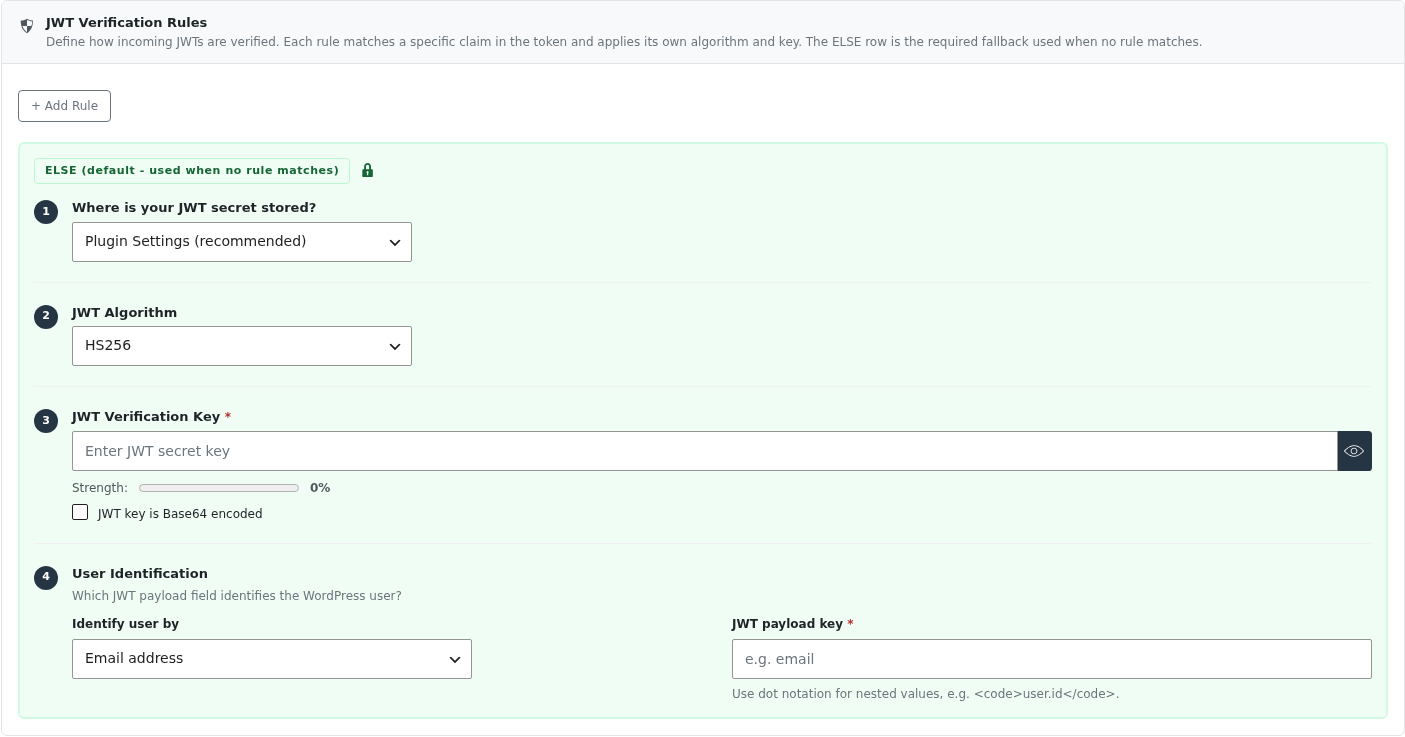
JWT Verification Rules let you use different signing algorithms and keys for different tokens - chosen dynamically based on a claim inside the token itself. This is useful when:
- You accept JWTs from multiple identity providers (Auth0, Google, your own service)
- Different clients were issued tokens under different algorithms
- You want to migrate keys without forcing all users to re-authenticate at once
The rules are evaluated in order. The first rule whose condition matches is used; if none matches, the ELSE (default) rule is used.
How a rule works
Each rule has three parts:
IF - a condition that inspects a claim in the incoming JWT
| Field | Options | Description |
|---|---|---|
| JWT Part | Payload claim / Header claim | Which part of the JWT to inspect |
| Claim Key | text | The key to look up (e.g. iss, alg, x-provider) |
| Operator | equals / contains | Comparison to apply |
| Expected Value | text | The value the claim must match |
THEN USE - the algorithm and key to apply when the condition matches
| Field | Description |
|---|---|
| Algorithm | HS256, HS384, HS512, RS256, RS384, RS512 |
| Secret Key (HS*) | Symmetric secret; optionally Base64-encoded |
| Public / Private Key (RS*) | PEM-encoded RSA key pair |
IDENTIFY - how to look up the WordPress user from the token payload
| Field | Options |
|---|---|
| Identify user by | Email address / WordPress User ID / WordPress Username |
| JWT payload key | The payload field that holds the identifier (e.g. email, sub, user.id) |
Use dot notation for nested values - e.g. user.id to read { "user": { "id": 42 } }.
The ELSE rule (required default)
The ELSE row is always present and cannot be removed. It is used when no IF rule matches, or when no IF rules have been added.
The ELSE row has four steps:
Step 1 - Key source:
| Option | Description |
|---|---|
| Plugin Settings (recommended) | The secret is entered directly in the settings form |
Code (wp-config.php or custom plugin) | Define SIMPLE_JWT_PRIVATE_KEY (and SIMPLE_JWT_PUBLIC_KEY for RS* algorithms) as PHP constants |
Storing the key in code keeps it out of the database. Example for wp-config.php:
define('SIMPLE_JWT_PRIVATE_KEY', 'my-super-secret-key');
define('SIMPLE_JWT_PUBLIC_KEY', '-----BEGIN PUBLIC KEY-----\n...');
Step 2 - Algorithm: Select the signing algorithm (HS256, HS384, HS512, RS256, RS384, RS512).
Step 3 - Verification Key: Enter the secret key (HS*) or public/private key pair (RS*). For HS* algorithms, check "JWT key is Base64 encoded" if your key is Base64-encoded.
Step 4 - User Identification: Which JWT payload field identifies the WordPress user.
| Field | Options |
|---|---|
| Identify user by | Email address / WordPress User ID / WordPress Username |
| JWT payload key | The payload field name that holds the identifier (e.g. email, sub, user.id) |
Use dot notation for nested values, e.g. user.id to read { "user": { "id": 42 } }.
Example: multi-provider setup
| Rule | Condition | Algorithm | Key |
|---|---|---|---|
| IF | iss equals https://auth0.example.com/ | RS256 | Auth0 public key |
| IF | iss equals https://accounts.google.com | RS256 | Google public key |
| ELSE | (fallback) | HS256 | Your site secret |
JWT Input Sources
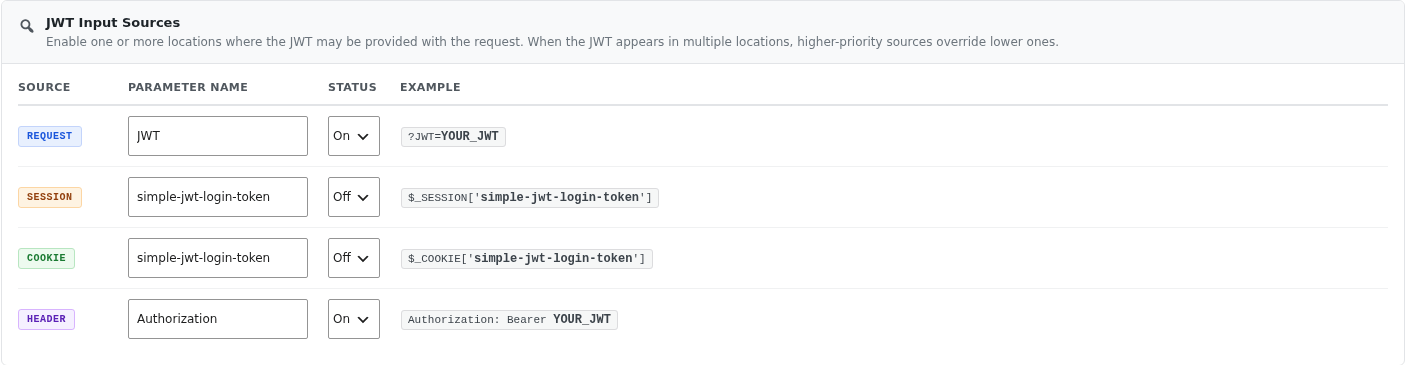
The plugin must know where to look for the JWT in each incoming request. Enable at least one source. When the JWT is present in multiple locations, the higher-priority source wins.
| Source | Default parameter name | Default status | Example |
|---|---|---|---|
REQUEST | JWT | Enabled | ?JWT=your.token.here |
SESSION | simple-jwt-login-token | Disabled | $_SESSION['simple-jwt-login-token'] |
COOKIE | simple-jwt-login-token | Disabled | $_COOKIE['simple-jwt-login-token'] |
HEADER | Authorization | Enabled | Authorization: Bearer your.token.here |
You can rename the parameter for each source. For example, changing the REQUEST name from JWT to token means clients send ?token=... instead of ?JWT=....
The recommended approach is to keep HEADER enabled and send tokens as Authorization: Bearer <token>. This is the most widely adopted pattern and avoids tokens appearing in access logs.
Integration Options

JWT Middleware for all WordPress endpoints
When enabled, any WordPress REST API request that includes a valid JWT will be automatically authenticated as the identified user before WordPress processes the request.
This lets you do things like creating posts or accessing user-specific data through the standard WordPress REST API (/wp/v2/*) using a Simple JWT Login token - without any extra plugin.
curl -X POST "https://example.com/wp-json/wp/v2/posts" \
  -H "Authorization: Bearer YOUR_JWT" \
  --form title="Hello World" \
  --form content="Post body here" \
  --form status="publish"
Security Options

Enable safe redirects
When enabled, the plugin uses WordPress's wp_safe_redirect() for all redirects instead of wp_redirect(). This restricts redirect destinations to the same host and a configured allow-list, preventing open redirect vulnerabilities.
Enable this option unless you have a specific reason to redirect to external domains.